iOS: Using S/MIME to send encrypted messages
iOS offers support for S/MIME, allowing you to send encrypted email messages.
Sending encrypted messages requires the recipient's certificate (public key); Mail accesses this certificate using one of two methods, depending on whether the recipient is in your Exchange environment. This article explains both methods.
Sending an encrypted message to someone in your Exchange environment
If the recipient is a user in the same Exchange environment, iOS will retrieve the necessary certificate for message encryption. iOS will consult the global address list (GAL) and your contacts. These steps describe the process.
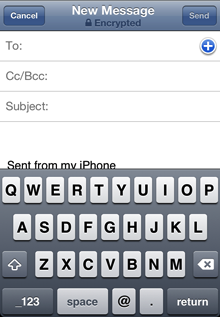
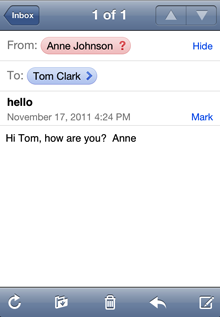
- Compose a new message in Mail. Notice the lock and Encrypted designation at the top, verifying that S/MIME message encryption is enabled for your Exchange account.
- Begin addressing the message to a recipient in your Exchange organization.
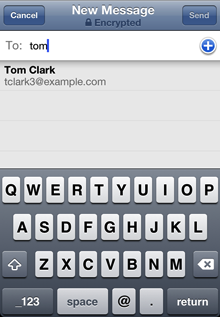
- Mail consults the GAL to discover the recipient's S/MIME certificate.
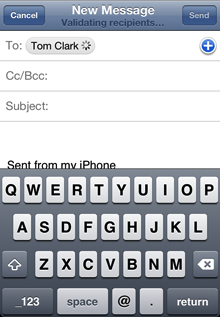
- When Mail finds a certificate, a lock icon appears to the right of the recipient's contact name, and the address is highlighted in blue.

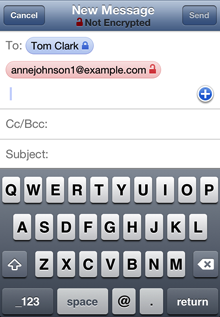
- If you add a recipient whose certificate Mail cannot find, that address is highlighted in red and an unlocked icon appears to the right of the recipient's address. The message designation will now show unlocked and Not Encrypted.
Sending an encrypted message to someone not in your Exchange environment
If the intended recipient is outside the sender's Exchange environment or if the sender is not using an Exchange account, the recipient's certificate must be installed on the device. Use these steps to do so.
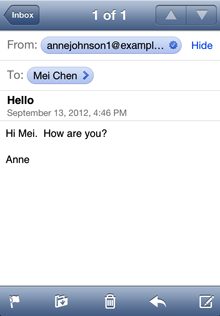
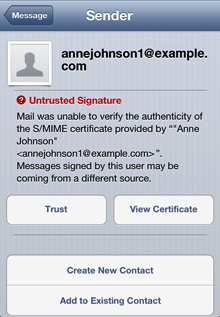
- In a signed message from the intended recipient, tap the sender's address button ("Anne Johnson" in the example below). Invalid signatures have a red question mark to the right of the sender's address. Mail indicates valid signatures with a blue check mark to the right of the sender's address.
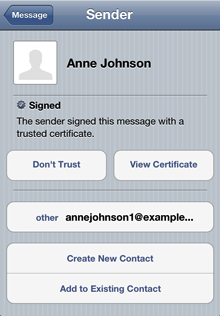
- In the detailed Sender view, tap Trust. Note: This step applies only if the sender's certificate was issued by an unknown certificate authority.
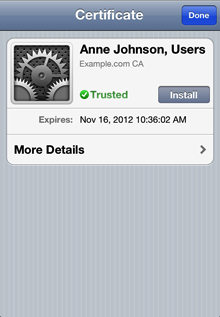
- Now that the signature is trusted, tap View Certificate.
- To install and trust the sender's signing certificate, tap Install.
- The Install button changes color to red and reads Remove. Tap Done in the upper-left to complete the certificate-installation process.
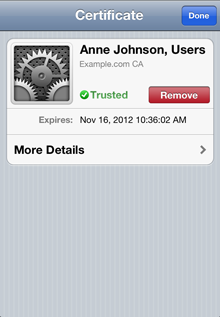
- iOS associates this digital certificate with the recipient's email address, allowing for message encryption.
Information about products not manufactured by Apple, or independent websites not controlled or tested by Apple, is provided without recommendation or endorsement. Apple assumes no responsibility with regard to the selection, performance, or use of third-party websites or products. Apple makes no representations regarding third-party website accuracy or reliability. Risks are inherent in the use of the Internet. Contact the vendor for additional information.
Related Articles
How to send a digital signed and encrypted email from an iOS 8.1 device
Requirements Before configuration, make sure that your digital ID (also called digital certificate) is ready in PKCS12 format (file with extension .pfx or .p12) Supposing that your email account has been configured in your device Getting started ...Secure email messages by using a digital signature - Microsoft Outlook 2010
By digitally signing a message, you apply your unique digital mark to the message. The digital signature includes your certificate and public key. This information proves to the recipient that you signed the contents of the message and not an ...How to send a digital signed and encrypted email - Microsoft Outlook 2007
Requirements Before configuration, make sure that your digital ID (also called digital certificate) is already installed. If the certificate has not been installed, then you need to get a digital ID Getting started Open Microsoft Outlook 2007 -> ...How to send a digital signed and encrypted email - Microsoft Outlook 2013
Requirements Before configuration, make sure that your digital ID (also called digital certificate) is already installed. If the certificate has not been installed, then you need to get a digital ID Getting started Open Microsoft Outlook 2013 -> ...How to send a digital signed and encrypted email - Microsoft Outlook 2010
Requirements Before configuration, make sure that your digital ID (also called digital certificate) is already installed. If the certificate has not been installed, then you need to get a digital ID Getting started Open Microsoft Outlook 2010-> ...